

If you want to learn the Lombardo method, then start reading. If you want to learn how to shade, then click here. If you want to learn about proportion, then click here.
Oh, and as a side note, please ignore the quality of the picture. This was done quickly to show you how to use the Lombardo method and basic shading techniques...it isn't going to be the next Mona Lisa.
STEP 1: The Skeleton's Pose
The first thing you want to do is figure out what you're going to draw. You need to know what pose to use, what will be in the background, etc. This is where the Lombardo method is especially helpful, because you don't have to go through the trouble of figuring out a pose, only to keep screwing up and getting erase marks all over your paper. The easiest way I've found is to start from the top and work your way down.
Draw lightly. Do not press hard. I simply can't stress that enough!
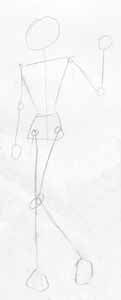
Draw a circle for a head. Draw a line for the torso. Draw a line perpendicular to the torso for the shoulder width. Draw a rectangle for the hips. At this point, I like to draw the torso outline for a basic shape of the gender I'm drawing. If I want to make it fatter, skinnier, or more muscular, I can add that later. I just want to get a basic shape.
Now you need to draw the joints in the shoulder and hips. For this, I use circles. Next, draw a line for the upper arm, a circle for the elbow, and a line for the forearm. Draw a square for the hands, and draw the fingers however is easier for you (I've used just lines, and I've also used lines with circles at the finger joints. I find the latter way more useful when having bends in the fingers). From here, you can draw a line from the hip joint to be the thigh, then a circle for the knee, then a line for the lower leg. I draw blobs for feet in the general shape of how I want the foot.
I hope that wasn't confusing. I suggest drawing it as I have laid this out, step by step, and you'll realize it's actually very easy. If you aren't sure of how to do proportions, then don't worry...I'll talk about that after explaining the Lombardo method. You can jump to it by clicking here. Here's an example to better show you what I talked about above:
STEP 2: Outlining the Body
Once you have a pose you like, you can start adding the body. Treat the lines as bones (this is why I call it a skeleton), so when you add the body, keep the lines in the middle of the outlines you add. This is just to help with placement, and to make sure that nothing looks out of proportion from one side to another. If you'd prefer to use the skeleton's lines as a bottom line instead of like a bone, that's up to you...whatever works best.
Anyway, this is the fun part, for me anyway. You get to really add shape to the body! This is where you can decide if the body is fat, normal, skinny, super-muscular, or if there's a giant bionic arm on one side or something. :) This is also the step where you add the hair. I can't stress this enough: add the hair around the head. This is why you draw the entire skull BEFORE adding the hair. You ever see a picture where it looks like the head is too flat? It's because people just draw the face and then add the hair on top of it. This method will eliminate the flat-head look because you get to see where the skull is.
Draw lightly. Do not press hard. I simply can't stress that enough!
Once you've added the outline to the body, you'll get something like this (I've decided to make her have a skinny body type with braided hair):
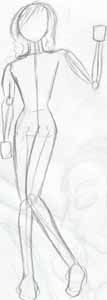
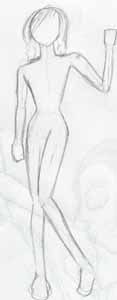
Once you're at this point in your drawing, you can erase the skeleton lines. As soon as you do, you'll see a real body starting to shape up:
STEP 3: Clothing
Now you need to draw some clothes. Want to make your character naked? Then click here skip onto Step 4. Remember how we drew the body outline BEFORE erasing the skeleton lines? And remember how, twice already, I told you to draw lightly? Here, we'll add the clothes, and it's important that you didn't press hard or else you'll get visible erase lines of the body through the clothes...we don't want that.
One important thing to remember is that clothes hang. Unlike the skeleton frame we drew and the body around it, you will NOT always put the body directly in the middle of the clothes. Here, I have the arm on the right bent up, so there will be more cloth below the arm than on top of it. My best suggestion for getting wrinkles right is to do what I did: go to google.com's image search and type in "pants" or "shirt" or any other clothing that you're looking to draw.
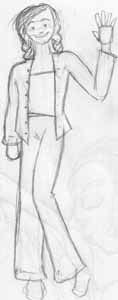
Once you've drawn the clothing around the body, you'll end up with something like this:
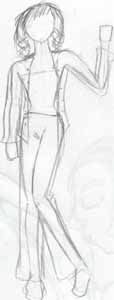
Now, just erase the parts of the body that the clothing covers up. Ignore the little smiley face I drew:
Notice that this was the time I decided to draw the fingers. I wasn't sure exactly how I wanted them, so instead of drawing them in Step 2, I just waited. Don't feel like you have to complete the whole thing as I laid out...you can always wait on a certain part you aren't sure about.
STEP 4: Shading
So many people have problems with shading. The biggest thing you'll ever have to deal with is what style shading you want. Finger smudged? Gritty? Super-smooth? None? Whatever you decide, here are the basics of getting a good shade.
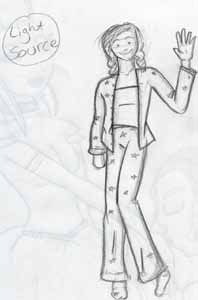
The most important step in shading is to pick a light source. You can even draw a circle on the paper and write "light source" in it to remind you, as I've done here. Once you know where the light is coming from, start to darken areas that are not hit directly by the light. Not only will the opposite side of your subject be darkened, but don't forget the wrinkles...even if they look like they're hit by the light. You'll get a preliminary shade, like this:
Once you have that, you can start to shade. The easiest way to get an even, gradient shading is to first darken the original shading you did above (the part where you lightly shaded what wasn't hit by the light), and then to move away from that shading and slowly press lighter and lighter. This is also the time for you to color anything, or make something darker or lighter as a whole if you don't use color as seen here:
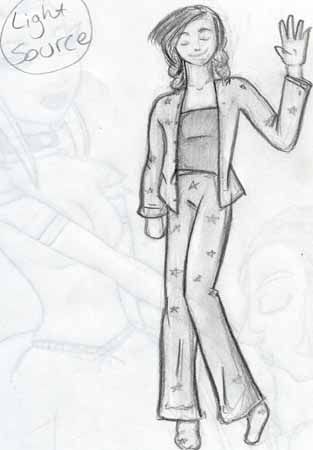
This is your finished product. If you want to add more, like jewelry, guns, or whatever, you can certainly add it at this final step instead of adding it earlier. Now's your time to darken things as you see fit (depending on your style)...so yes, you don't have to press lightly anymore if you don't want to!
PROPORTION!
I can’t tell you how many people have problems with proportion. The Lombardo method should help you because it’s easier to judge the length of lines than a fully-drawn arm. That doesn’t mean you’ll magically know what to do, so here are basic proportions. They’re all for humans, I don’t have any for animal proportions, sorry. Just look at a few pictures of the animal species you want to draw to get a basic idea. Try to break the body down into lines and circles in your head.
BASIC PROPORTIONS
- The upper arm and forearm are the same length, with the elbow being the midpoint.
- The upper leg and lower leg are the same length, with the knee being the midpoint.
- The neck is about 3/4 the height of the head.
- When standing with arms at the sides, the fingers should reach the midpoint of the upper leg.
- Each shoulder is about two chin widths (at the widest point of the chin) away from the neck.
- The legs are about 1.5 times the length of the torso (for children, the legs are about the same length as the torso).
- Including the neck, the torso is about 3 heads tall (for children, about 2 or 1.5).
- Women’s foreheads make up 1/4 of their head, men’s make up 1/3, and children about 1/3 to 1/2.
- To prevent the "flat-head" look, draw the skull and then add the hair around it instead of drawing the face and putting the hair on top.
Easy enough, right? Give it a shot, and please email me or sign the guestbook if you have any questions or something to add! :)
FAQ
Q: What pose should I do?
A: Whatever pose you’d like, just use the Lombardo method to help you with proportion. Make sure you don’t use the same pose over and over and over and over and over. That gets really boring.
Q: I like anime and would like to draw it. Will these proportions help me?
A: No. The proportions I’ve given here are to draw regular humans without any consideration to your personal style. Remember, anime is another genre of art, just like American comic book or surrealism: there ARE different styles within the genre. The art in Pokemon looks different from that in Kenshin from that in Neon Genesis Evangelion. There is no one anime style, there are many. See what you like best. A few good rules of thumb:
*Be detailed with clothing, but rarely to never with the body of the character.
*Characters tend to be skinnier and lankier, but this is not always true.
*Show a lot of emotion through different means, including (but not limited to): sweat drops, nose bleeds, blushing (sometimes accompanied with red lines across the cheeks), a vein, visible sighing, etc.. Keep in mind that these do not need to be overly huge and cartoony.
*Show little detail in the hair. By this, I mean don’t draw a bunch of individual hair strands, but rather chunks of hair. Don’t forget to add shine to the hair, but minimal (or no) shading is added to the hair.
Email me or sign the guestbook if you have any more questions!
|